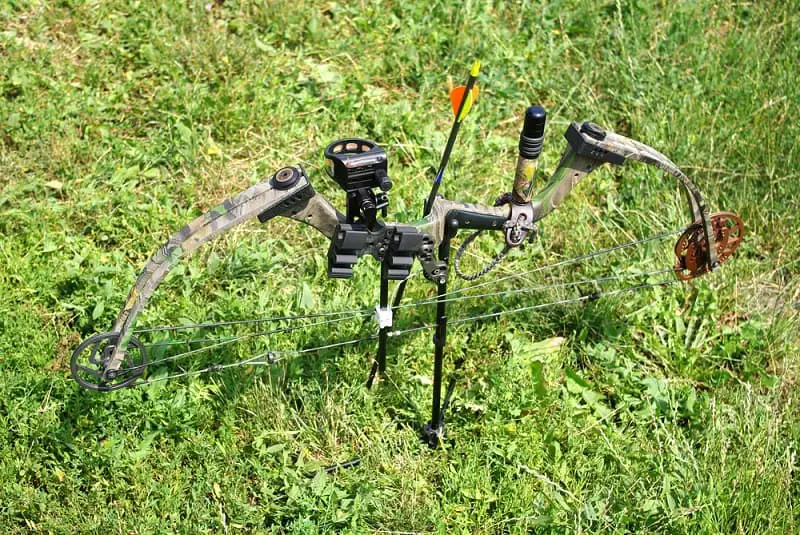
Shooting a compound bow the first few times can be a daunting task. Eventually, you get used to it, but at first, they can seem very complicated.
That is completely understandable. There are a ton of moving parts on a modern compound bow that don’t have an obvious function. They can look convoluted compared to the more traditional recurve bows you’ve seen on movies and television.
I am a competing archer and I know all about it. Let me break down everything you need to know about the compound bow parts, what they do, and how they work. I will also cover the accessories you’ll need to complete your setup, and the measurements you’ll see listed when shopping for compound bows.
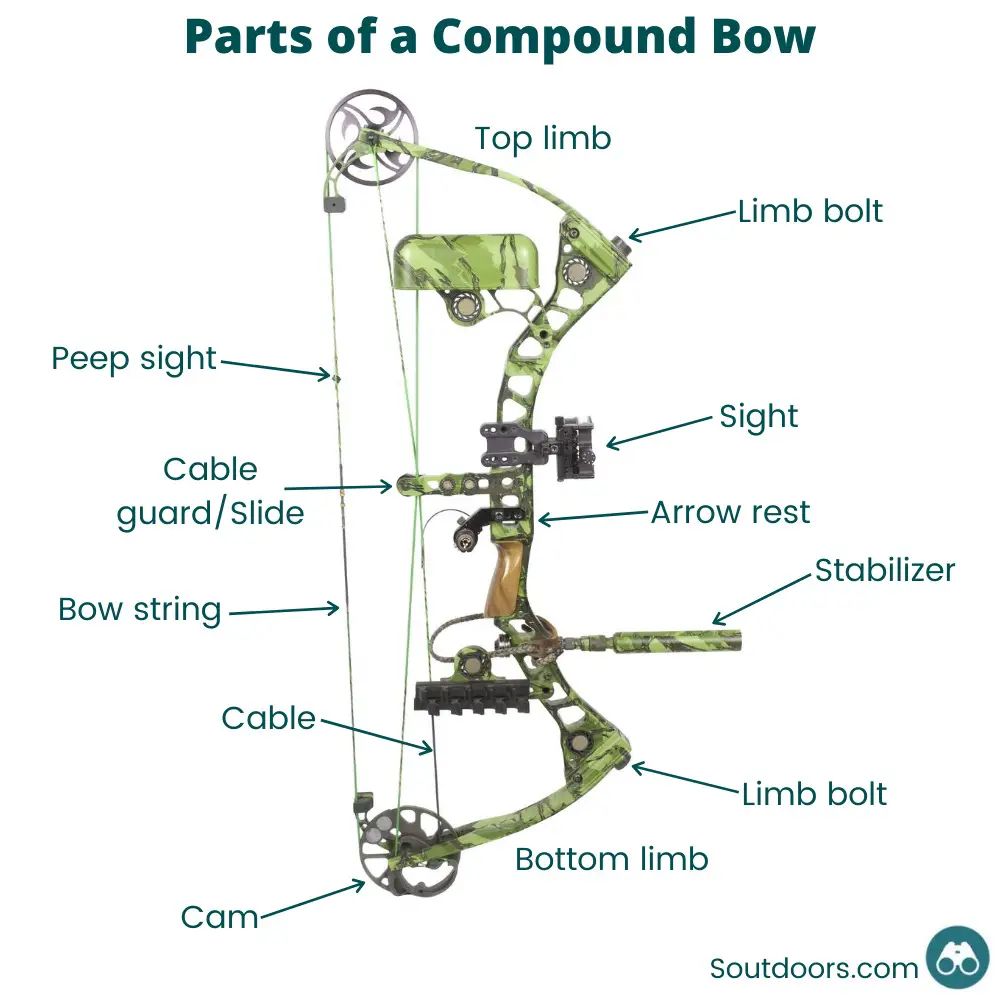
Compound Bow Parts
To start, I’ll cover the basic parts of a compound bow. I’ll be covering everything that comes assembled on the bow from the factory. The next section will get into the accessories commonly added to bows.
Riser
The riser is the central “body” of the bow to which all the other parts will attach. Risers are almost always aluminum, but some newer high-end bows I tried have carbon fiber risers. The grip of your compound bow is in the center of the riser. Some bows have grips carved into the aluminum, while some have attached customizable wood or plastic grips.
The riser is also where all of your bow accessories will attach. All modern compound bows have standard threaded holes to attach arrow rests, stabilizers, sights, and bow slings. If you’re trying to fix up a vintage bow, it may need differently sized accessories than those made today.
Limbs
Attached on either end of the riser are the compound bow limbs. They usually consist of different laminated combinations of wood, fiberglass, and carbon fiber. Energy builds in the limbs when you draw the compound bow back. It’s that energy that propels the arrow when you release the bow string.
The bow’s limbs determine the range of draw weight of your compound bow has, and you can find this by checking the label on your limbs. You can swap the limbs on most bows, which will change the range of draw weights they can adjust to. If you want to change the limbs on your bow, the safest way is to have an archery shop change them out with a bow press.
Limbs can consist either of a single piece or two pieces (split). While split limbs offer durability and strength over single piece limbs, they can introduce issues such as riser torque if they are not matched evenly.
Limb Bolts
The limb bolts are the bolts that connect the bow’s limbs to the riser after they slide into a limb pocket. They adjust with an Allen wrench. Tightening or loosening a limb bolt changes your bow’s draw weight.
It’s important to adjust them equally, making sure to put the same amount of turns in both the top and bottom bolt.
I made this mistake once and did not follow this rule. As a result, I ended up trying to shoot a bow with one limb pulling ten pounds heavier than the other, which was not be pleasant at all!
Cams
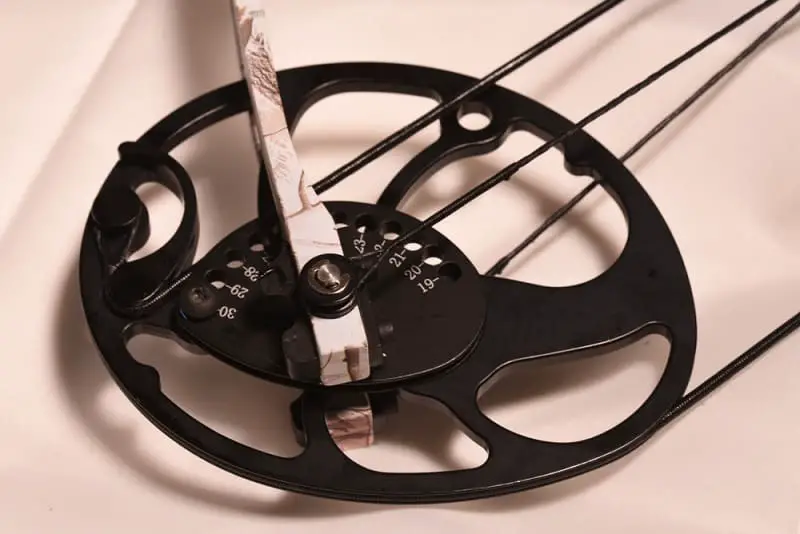
The cams are the pulleys on either end of the compound bow. They attach to the end of the limbs, and they’re elliptical or wheel-shaped. The cams also determine your draw length and let-off percentage, which we explain in more detail in the measurement section below.
Like limbs, you can swap the cams (or sometimes modules attached to the cams) to change your draw length, let off, or even how your bow feels to draw and shoot.
There are several different types of cams. The two basic categories are single and dual cam bows.
Single cam bows (also known as “solo cam”) have an elliptical cam on the bottom limb, and a round idler wheel on the top. The main advantage of a single cam bow is that the cams can’t get out of adjustment with each other, simply because there’s only one. This helps make them easier to shoot accurately.
Dual cam bows (also called “twin cam” bows) are much more common. Each compound bow manufacturer uses different cam designs, so it’s hard to make any all-encompassing statements about dual cam bows. The cam you have on your bow won’t make a lot of difference in the long run. The best thing to do is to pick a bow that feels comfortable to draw and shoot.
Bow String
The bow string is a thick thread connecting the cams. It’s where you install your peep sight and d-loop, and where you will nock your arrow. Compound bows actually have a system of several different bow strings; the string that your arrow attaches to is the bow string, while the other strings attached to the cams and the cable guard are called cables.
Compound bow strings and cables are one of the most customizable parts of the bow. There are thousands of different combinations of materials and colors that you can install on your bow.
It’s vital that you check your bow string for damage or wear before you shoot. If your string just looks “fuzzy,” it probably just needs some bow wax to keep it in good shape. But if any of the strands are cut or torn, it’s best to get the string replaced so you can safely shoot it.
Cable Guard/Cable Slide
The cable guard is the rod attached to the bow riser, and the cable slide is the plastic piece that attaches the bow string to the guard. The cable slide holds the cables out of the way of your arrow and string so that they slide along the cable guard instead of getting in the way of your shot.
You shouldn’t have to worry very much about the cable guard and cable slide. Just check that your cables are sitting securely in the slide and that it isn’t cutting the strands that make up your cables.
Compound Bow Accessories
There are a few accessories you’ll want to get to complete your compound bow setup. We’ve listed them here so you know what they do, and what you should purchase.
Arrow Rest
The arrow rest attaches to the middle of your riser. It holds your arrow in place while you’re drawing and shooting your bow. There are a variety of different brands and types of arrow rests. The style of rest you should choose has a lot to do with what kind of archery you want to shoot and your skill level.
A full containment rest is the best for beginners shooting any kind of archery with a compound bow. As the name implies, this rest surrounds the arrow, keeping it supported in the same place until firing.
This kind of rest is great for beginners and younger archers because the arrow stays completely supported, with no risk of falling off the bow during the shot. A Whisker Biscuit is a common full containment rest that is perfect for beginner archers.
Drop-away rests are the preferred rest for bow hunting, but some people like them for target archery as well. A drop-away rest supports your arrow while you’re drawing your bow.
It then drops away when you fire your arrow, leaving nothing but the bow string in contact with the arrow. Drop-away rests usually attach to a cable, allowing them to drop instantly when you release the string.
Blade rests are almost exclusive to target archery. They support the arrow on a thin blade of metal with a “V” cut into them. The V cradles and supports the bottom of the arrow shaft.
Blade rests usually have a wide range of adjustment so you can dial them in. The most expensive rests will have micro-adjustments.
You can technically shoot from the arrow shelf but it is more convenient to have an arrow rest.
D-Loop
A D-loop is a loop of heavy-duty cord or string attached to the bow string. It attaches at the point where your arrow nocks or attaches onto the string. It works with the arrow rest to keep your arrow safely supported while you’re drawing and executing your shot.
Like the bow string, it’s essential to check your D-loop for damage often. If a D-loop breaks mid-shot, it can often send an arrow in an unsafe direction.
Release
A mechanical release aid, usually called a release, attaches to your D-loop and allows you to shoot an arrow more precisely than you can with your fingers. All compound bows manufactured nowadays, except some youth bows, require a release to shoot safely.
There are different kinds of release aids available. They all function very similarly, so it’s best to pick the one you can shoot most comfortably and consistently.
The most common type of release is the wrist strap release, also known as a caliper or trigger release. It attaches around your wrist with Velcro or a buckle and has a trigger that you use to fire your bow.
Handheld releases are another popular style. They have a body made of metal and space for 2-4 fingers to grip them when drawing the bow back. To fire the bow, they have a trigger that you can set off with your thumb. Some have a triggerless hinge design that will release your arrow when you rotate your hand enough to hinge the hook of the release off of the D-loop.
Sight/Peep Sight
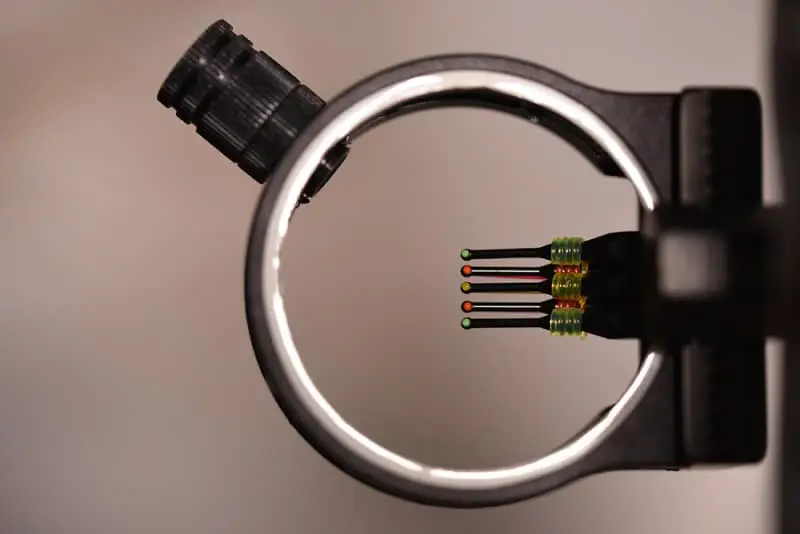
A sight is a device attached to the front of the riser that helps you aim. The peep sight is a metal or plastic circle installed into the bow string that you line up with the sight. The peep sight helps you aim the same way every time, as you need to align them with your dominant eye to see the bow sight.
The sight will have one or more pins, usually fiber optic, to give you a reference point to put on your target and help you aim. There are two types of compound bow sights; fixed-pin and adjustable-pin.
Fixed-pin sights are common in bow hunting. They have multiple sight pins set at specific distances. When you sight your bow in, you can set the pins for specific distances.
Adjustable-pin sights are common for target archery. They have one sight pin that you can adjust to different distances. You should record your distances with a sight tape, which you can print from software or create by hand.
Stabilizers
Stabilizers are the rods attached to the front of (and sometimes the back) of the compound bow. They help you aim more steadily and reduce vibration in the bow. They are usually weighted, and you can add or remove weights to customize how the bow feels to shoot.
Hunting bows often have smaller stabilizers so that it’s easier to maneuver through the woods. Target bows have longer stabilizers—sometimes longer than three feet. The reason they’re so long is that target archers don’t have to worry about space, and they can better balance their bows with multiple long stabilizers.
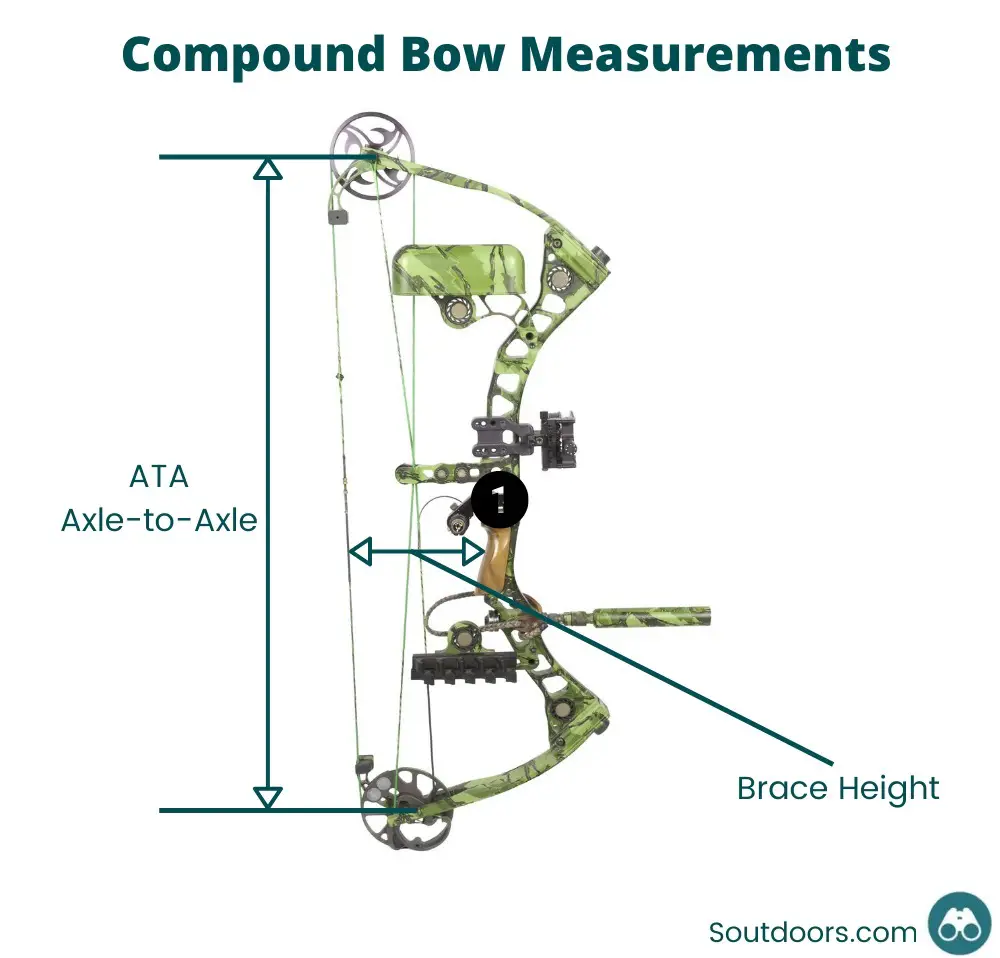
Compound Bow Measurements
Now that you know the parts of a compound bow and how they work, we’ll go over some compound bow measurements you’ll want to know. These measurements will be especially useful when shopping for bows. You’ll be able to compare bows more easily and have a good idea about how a bow performs even if you can’t shoot it.
Draw Weight
The peak draw weight of a compound bow is the heaviest weight the bow reaches, or the resistance you experience, as you pull it back. At full draw, you will only be holding a fraction of that weight thanks to let-off.
The weight you’re holding at full draw is your “holding weight.” Compound bows will have a range of adjustment for peak draw weight, which you can adjust with the limb bolts.
If you’re buying your first bow and don’t know what draw weight you should get, always pick something on the lighter side. A bow with this weight that is too heavy is likely to cause shoulder injuries.
Let-Off
About two-thirds of the way through drawing your compound bow back, the weight you feel will start to “let off” until it reaches the lower holding weight at full draw. Manufacturers measure let-off with a percentage, usually between 65% and 80%, which tells you how much weight you will be holding at full draw. For example, a bow with a listed draw weight of 70 pounds and 80% let-off will only be 14 pounds at full draw.
If you’re shopping for your first compound bow, don’t stress about let-off. Just get something that feels comfortable. It’s not likely you’ll notice much difference between different percentages of let-off.
Draw Length
The draw length of a compound bow is the distance you can pull the bow back before the cams stop the string. It’s important to buy a bow with the correct draw length. A bow with an incorrect draw length will be inaccurate and uncomfortable to shoot. To figure out your draw length, you can go to a bow shop and have them measure it for you, or look up a tutorial.
Arrow Speed
Arrow speed is simply how fast the bow will shoot your arrow. The industry measures arrow speed in feet per second (FPS). The arrow speed of your specific setup requires a bow shop to use a chronometer.
Almost all modern compound bows are more than powerful enough to be lethal while bowhunting, but there’s more to speed than just that. Once you tune your form, a faster bow can be more forgiving. An arrow fired from a faster bow will have a flatter flight path which minimizes errors made in judging distances.
Brace Height
The brace height is the distance measured in inches between the bow string and the deepest part of the bow grip. Archers call this the “pivot point” of the grip. A lower brace height will produce faster arrow speeds while making the bow less forgiving of user error. A higher brace height shoots slower but is more forgiving when you make mistakes.
Compound bows have a brace height set from the factory, which you shouldn’t change. This is unlike recurve bows that require some experimentation by the archer to find the best performing brace height.
Axle to Axle (ATA) Length
You can find axles in the middle of the cams, and they attach the cams to the limbs. The axle to axle (ATA) length of the bow is the measurement in inches from one axle to the other. This tells you how long the compound bow is.
ATA can be important for many reasons. For bow hunting, you’ll usually want a shorter ATA, so that it’s easier to maneuver in the woods and in a tree stand. Target bows have longer ATAs, because target archers don’t have to worry about space, and longer bows are usually more comfortable to shoot.
ATA can also be important to know for youth archers; you wouldn’t want to buy a compound bow for a child that’s as tall as they are.
Final Thoughts
That wraps up our guide to how to the parts of a compound bow! You should have all the knowledge you need to make sense of all the information thrown at you while comparing different bows, especially while shopping online.
If you have any more questions, check out some of our other tutorials, or head to your local bow shop and chat with a pro. They can be a wealth of information, and will be more than happy to help you on your archery journey.
